From 18th April 2020 to 25th Aug 2020, I have published:
- 83 social media posts
- 18 Blog Articles (Every tuesday)
- 2 eBook
- And, few other templates.
And, I got these results:
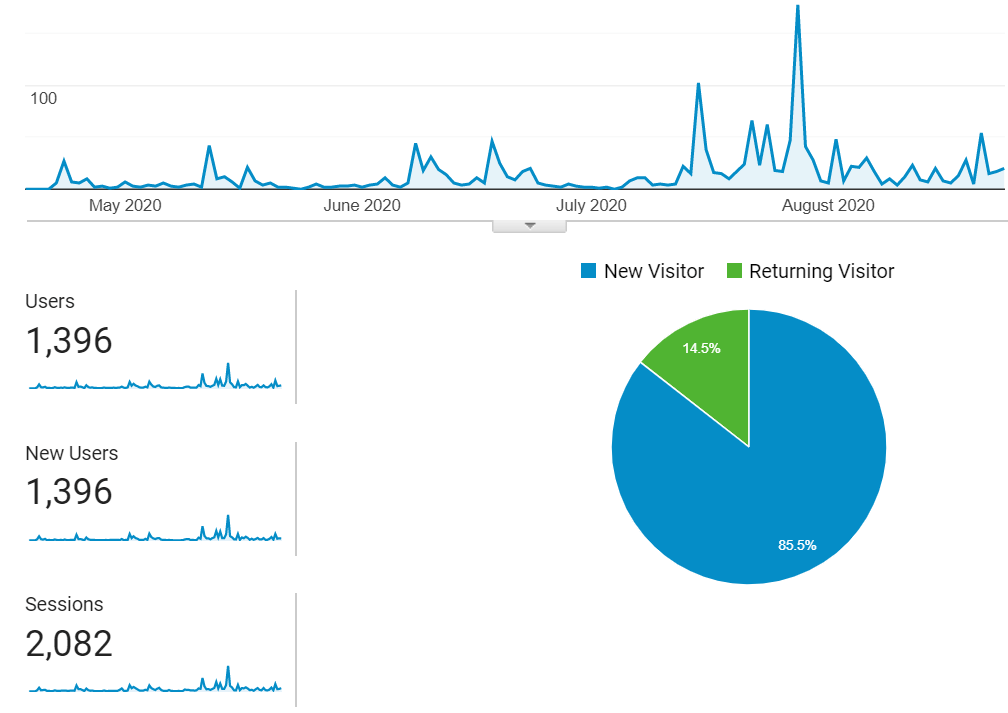
- 1396 Blog visitors (Considering I have started this blog in March 2020)
- 2548 Social Media engagements- Likes, shares, comments (I literally counted)
- Most importantly, I have been able to connect with some experts and marketers who want to share their learnings and queries with me.
Wait! I don’t prefer quantity over quality.
The reason I am sharing this is for the past few months, I have been able to create and publish content consistently without even breaking the consistency.
Two things I have learned from the above statistics:
- To get attention from your audience, you need to be consistent
- Quality matters most. (1 quality article works better than 10 mediocre blog posts)
But is it necessary to be inconsistent when you’re only producing quality content?
Or,
Can we only create quality content only when we’re delivering average quality content?
The answer is a big fat NO.
Only when you have a long term strategic plan, you can create content consistently without breaking the quality.
Hello, I am Rafiqul, a content marketing practitioner.
And, in this blog post, you’ll learn how to find a balance between quality content and consistent delivery?
I have divided the whole process into three different parts.
Let’s start with the strategy that I follow.
Setting a content repurposing strategy
Two most essential tips that I can share from my experience are:
- Never create content randomly; always have a plan
- Create every piece of content in a way that it can be repurposed many times
Let’s see how to do this.
Step 1. Start with Big
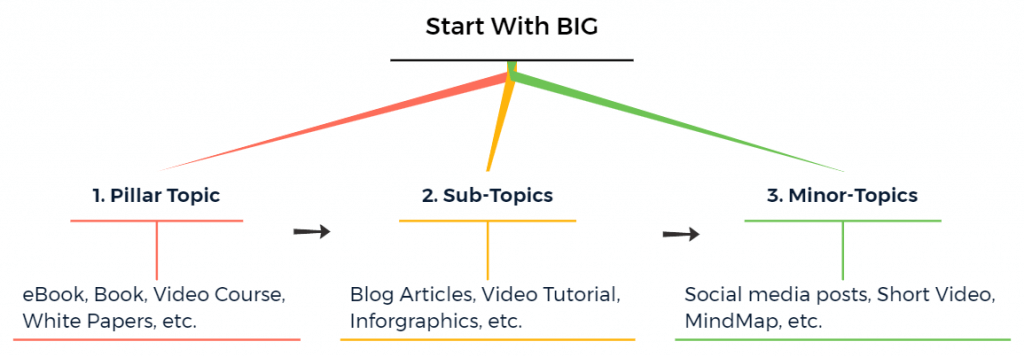
No matter what content format you’re going to leverage, you need to identify some pillar topic ideas within your niche.
Pillar topics are like a broad topic which covers A to Z about the topic.
For example, for a digital marketer, ‘the ultimate SEO guide’ could be a possible pillar topic idea.
Another example.
Since I’m into the content marketing field, some of the pillar content topics are Content marketing strategy, Blogging for business, content writing guide.
The first step is all about finding some broad topics ideas within your niche.
Make sure these topics are relevant to your service or product.
In that way, you can create content that is relevant and valuable for your audience.
[Tip: you may have multiple pillar content ideas for your niche. But I recommend you to start with one pillar topic and follow the below steps]
Step 2. Divide Pillar content ideas into subtopics
In the first step, you’ve identified the pillar content ideas for your niche.
Now, you need to divide that pillar content into multiple sub-topics.
Let me cite an example.
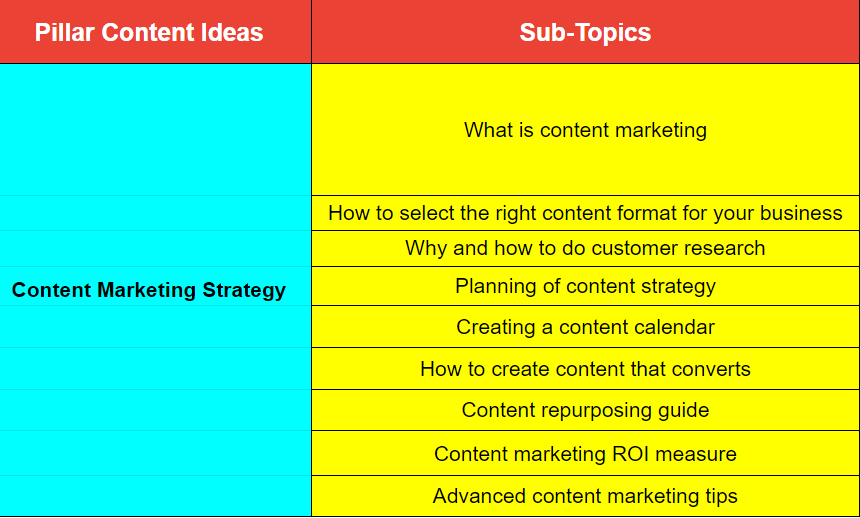
One of my pillar content topics is ‘Content Marketing Strategy’.
And for that topic, I have divided the entire topic into following subtopics:
- What is content marketing
- How to select the right content format for your business.
- Why and how to do customer research
- Planning of content strategy
- Creating a content calendar
- How to create content that converts
- Content repurposing guide
- Content marketing ROI measure
- Advanced content marketing tips
In that way, you also need to divide your primary topic (pillar content topic) into multiple sub-topics.
Keep in mind that there is no restriction in the numbers of subtopics for each of your pillar content.
The primary goal is to cover every aspect of your pillar topic.
If your primary content topic is about nutrition, then you need to cover every relevant nutrition information.
What do I mean by relevant information?
Let’s say one of your pillar content topics is ‘nutrition guide to live a healthy life’.
And, your target audience is the people (say 18-28) who want to live a healthy and fit life.
In this case, a subtopic idea like “childhood obesity as a nutrition issue” is not that relevant content as compared to a content idea like “Nutrition guide for busy people.”
The idea is to think from your audience’s perspective.
The more relevant sub-topics you choose, the better the content engagement you’ll get.
So, in this step, you’re going to divide pillar topics into sub-topics.
Step 3. Dividing sub-topics into Minor topics
Now, in this step, we’ll go one step further.
You’ll notice that every piece of sub-topics will have multiple small topics within it.
For example, the sub-topic “what is content marketing” may have the following minor topics:
- History of content marketing
- Why Content marketing is the future
- Definition of CM
- Are Content marketing and content strategy both the same?
Keep in mind that these minor topics could be very short in form.
That means if I write an article about content marketing, then each of the above minor topics could be of 50 to 150-word length.
And, that’s absolutely fine.
It is recommended to have at least 3 to 5 minor topics from each of your subtopics.
In the next step, you’ll understand how these minor topics will help you in long term planning.
Step 4. Understanding the content format
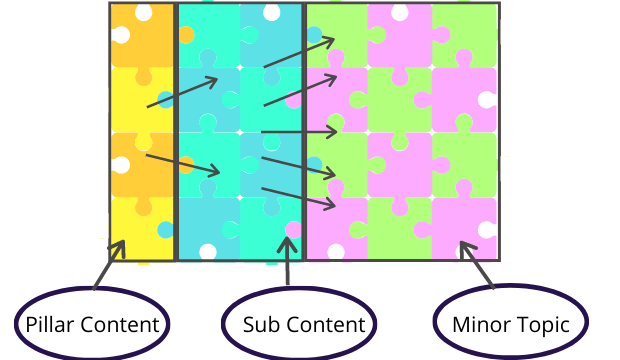
Until now, we have discovered three different types of content topics.
- Pillar topic (A large piece of a content topic that covers A to Z about the topic)
- Sub-topic (It is a part of pillar topic. Every pillar topic consists of multiple subtopics)
- Minor topic (A part of subtopics and Very short in the form)
Now, we’ll understand the role of each of these topics and how we can use this to get a long term content benefit.
Now, let’s see each of these topics in terms of content format.
Pillar topic
Each of your pillar topics will be your in-depth content. Some of the Possible ways of using your pillar topic:
- Book
- eBook
- Video Course
- White papers, etc.
Also, it’s not necessary, but it’s always good to use this pillar content as a lead magnet or as a gated content (paid or subscription).
Whether you’re planning content for video or blog format, this will give you a clear idea.
Sub-topic
Now that you know your pillar content (eBook, Video course, etc.), you need to dive right into the sub-topics.
Remember that each of your subtopics is a part of your pillar content.
In that way, you can reorganize each of your subtopics and turn it into a pillar content.
Some of the possible ways that you can leverage each of your subtopics are:
- Blog article
- Video tutorial series
- Infographics
- Podcast
- webinar
The key difference between sub-topics and pillar content apart from its in-depth information is the content goal.
I highly recommend using your pillar content either as a lead magnet or as a premium content (paid or subscription).
The reason I am saying this is because people give more attention and value when you present a complete solution in an organized way.
That is why you’ll see a higher conversion rate for an eBook (that covers an ultimate guide to any specific solution) than a blog post covering only a part of the specific solution.
Minor topic
The primary use of minor topics is to leverage social media.
The short format of the content is most likely to perform better on social media channels like Facebook, LinkedIn, Insta, and others.
So, you can curate multiple content ideas from each of your blog posts which is not going to be hard.
Let’s say a subtopic content (a blog article) is ‘content writing tips for beginners’.
In this case, the article might have multiple tips for content writing (say 5 tips).
Next, you can reorganize and edit each of these 5 tips and turn them into 5 different social media posts.
In this way, you’ll have 5 social media posts ready just from a single blog post.
[Tip: Try to add more relevant graphics not only for user experience but also to repurpose it in social media post format. That way you’ll have social media posts with text and multimedia format which works better than a simple text-based content]
Step 5. Approach to create content
As I’ve mentioned, you need to plan three types of topics for your niche even before creating content.
Once you’ve your ideas ready, you need to move forward to the next step.
In this step, you’ll see two different approaches to start creating content:
- Either start from pillar content
- Or from sub-topics.
Start with pillar content
In this case, you’ll start creating the pillar content for your niche.
Whether your pillar content is a video tutorial course, or a definitive guide or any other form, you’ll first create the content and only after then you’ll start distributing and repurposing.
This might take time to have content ready to go live, but once you’re done, you’ll have content for many weeks.
Here’s an example that I use to illustrate this.
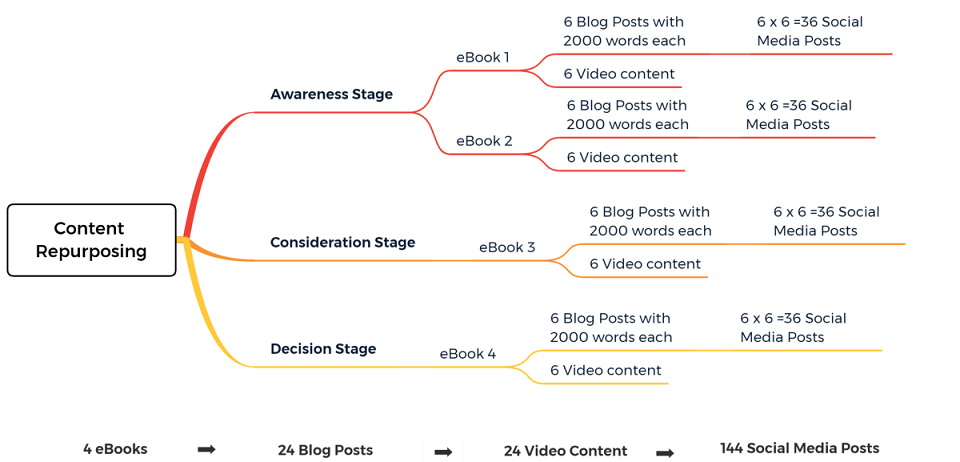
Let’s see the time breakdown of this example.
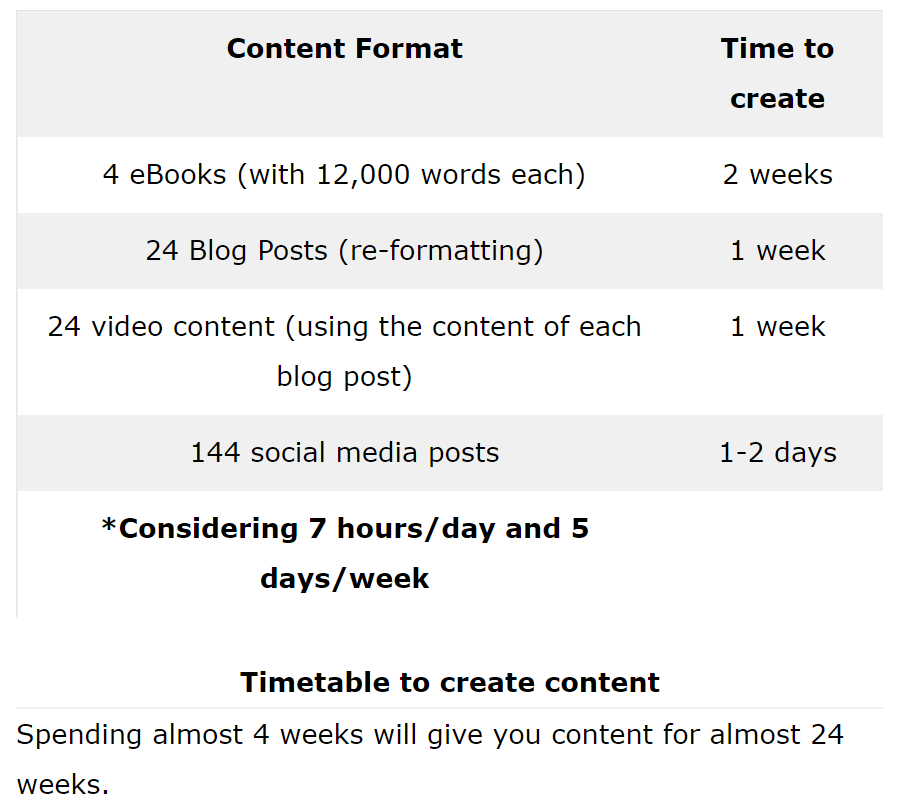
So if you’re in a no hurry and ready to invest your time before publishing content, then this might be your option.
Start with sub-topics:
The first difference of this approach from the previous one is you’ll start creating sub-topics.
But keep in mind that you’re not creating content just randomly, You’ll only create contents that you have previously.
For example, if I have decided to create subtopics for the pillar content (content marketing), then my following contents could be like:
This will also help me in getting a clear picture of what content to create next.
In that way, after a certain period, you’ll have your pillar content ready.
Once you’re done with every subtopic that you had planned, you can reorganize and edit them to turn it into a visually appealing eBook.
Again, don’t forget to curate minor content from subtopics for different social media channels.
Now, let me share how I create content and also repurpose it in multiple formats for better reach and consistency.
[You can also start with creating sub-topics. In that way, after covering all of the sub-topics, you’ll have your pillar content ready.]
My content creation process
It all starts with the Blog Article
I prefer creating content from sub-topics instead of pillar content. It’s because creating an in-depth article once a week is my sweet spot.
And, in terms of content format, blog articles are the primary format that I use to repurpose for other formats.
Since I’ve already my topic ready for writing blog posts a week, it becomes easier for me to start with.
Even if I write one blog a week, it takes time.
From writing the tagline to hitting publishing button, the process looks like this:
1. Start with having at least two headline ideas
I complete writing the blog post in 4-5 hours or even up to 6 hours (usually I dedicate my half-day for this)
(The average length of my blog post is above 3,000 words)
2. I never edit or reorganize the article on the same day I write.
3. Next day I start editing content that includes structuring the headings of the article, interlinking, external linking, headline, writing a meta description, readability test, and including opt-in email form within the article.
It usually takes around an hour to complete the editing part.
4. Next, comes the graphics part. I easily spend 2-3 hours creating images, alt-tags, slide decks for the article.
It’s because I always use customized images for each of my blog posts. I also recommend everyone to have an impact on your readers.
5. After that, I schedule the blog post for next week.
I always prefer writing at least one article in advance. In that way, even If I am not able to write for a week, my consistency will be intact.
That’s how I write the articles for my blog, and on average, I take around 10-12 hours to make an article go live.
6. My next target is to see whether I can make a video format of the same content or not.
You’ll see many youtube videos where the content is almost the same as blog articles.
Here’s an example.
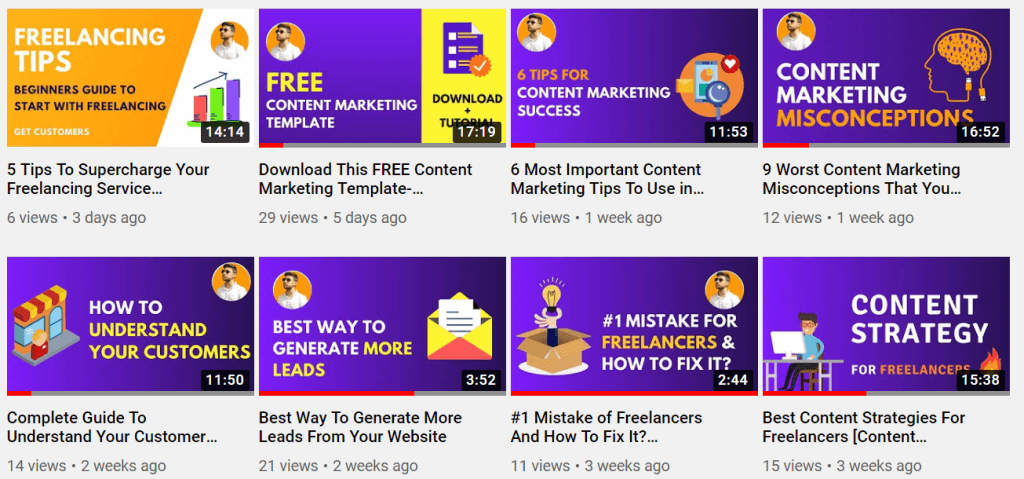
- Subscribe to my channel to get Useful Content marketing videos
Even the article you’re reading now is also available on my YouTube channel.
Make sure you subscribe to my channel for more content marketing videos.
Many people think having the same content in different formats doesn’t add much value.
Here’s my take on this:
Not everyone is a blog post lover. Some part of your audience will like to read blog posts, whereas others will prefer podcasts or even video.
So having the same content in multiple formats will help you to reach more targeted audience.
And most importantly, it is really helpful because I don’t have much time to think about fresh content ideas for each of the content platforms.
As long as it adds some value to my audience, I keep turning one format into another.
If you’re someone who wants to save time like me, give it a try. It might work wonders for you.
Want to know the biggest content repurpose I have done so far?
You might get some serious value from it.
Here it is
A few months ago, I had written a blog post called “17 important tips to create quality content”.
Next, I curated 17 minor contents (for each of the 17 tips) from that blog post.
Since I have added relevant images for almost every tip, I created a slide deck.
Not only that I also converted that blog article into video and audio format.
After all of this stuff, here’s what I got:
- 17 social media posts
- 1 youtube video
- 1 podcast episode (I am yet to publish it)
- 1 slide deck
Isn’t it cool?
If I had to create this much content separately, it would’ve taken 3 or 4 days.
Last but not least, the tip that I have for you is about the newsletter.
Learn from my mistake
Content repurposing is amazing, but one thing I highly recommend is never to try your content repurposing on your newsletter.
It’s not that the people who are in your email list will not get any value.
To make it clear, let me ask you a question.
Why do people join your newsletter?
Two primary key reasons are:
- To get valuable content from you
- To get exclusive content that they won’t get anywhere from you.
That means if people can get the same content from your social media channels, blog, then what’s the need to be a part of your list?
This is why I stopped sending the same repurposed content to my email subscribers.
It is not necessary; even you’ll see many marketers who are doing this.
But what gives super importance to my email subscribers because my goal is to build a loyal audience.
And to do that it’s obvious to add more value to the list.
Want to join the VIP list?
- Join the team and get access to the content marketing template for free.
Apart from that, I also use many tools for managing my content.
Let me show you some of the tools that I am currently using.
Tools I use for creating and managing content
XMind (MindMapping Tool)
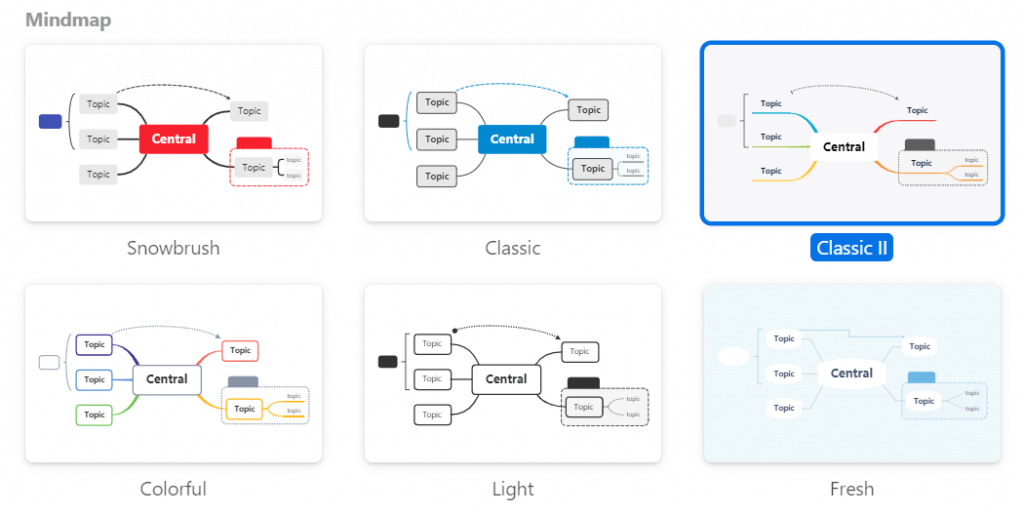
One of my favourite tools is Xmind. A simple yet powerful mind mapping software that lets you create mind maps for complex topics.
Before writing any blog article, I do research more and more about the topic.
And it started with this tool. First, I start by listing all the important topics for the blog post.
Next, I go deep into each of the selected topics.
That way, I got a clear idea while I am writing.
But that’s not all.
Since I am using mind maps for almost all of my content, I have an option of using these Mind Maps as a lead magnet.
My idea is to compile all of these mindmaps that I have created so far and organized in a way that it covers a specific topic.
Editing part will also be there to make it more presentable.
Next, I will use this.Zip file as a lead magnet.
So, instead of investing so much time and effort to create a valuable lead magnet, I am getting one efficiently.
Portent’s content idea generator
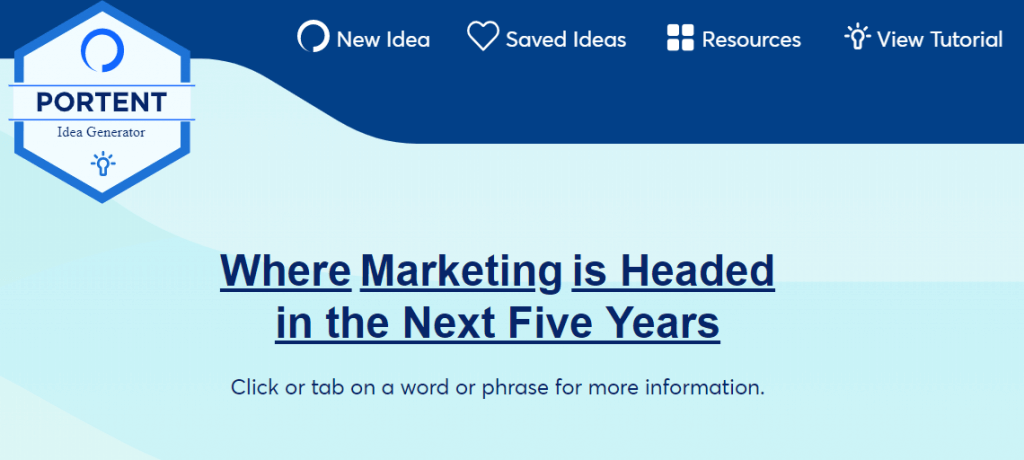
In a word, this tool is amazing.
Whenever you’re out of content ideas, go to this site.
You’ll find some amazing topic ideas that you have never thought of.
You can also leverage this tool as a headline generator.
Evernote

Most of the time, I get some insane content ideas when I am not at my working desk.
And not noting down your idea is probably the biggest mistake.
Evernote lets you take notes from Pc and smartphones as well. This helps me in taking notes, saving screenshots whenever I want.
And, I can access that information from both Pc and Android as well.
If you’re also like me who get tons of cool ideas during off time, then this might help you.
Canva

The only app I use to create all of the images that you see on my blog.
The free version is more than enough for a beginner.
In canva, I’ve created a separate folder for different formats (Blog featured image, youtube thumbnail, Insta posts, etc.)
That helps me in two ways:
- First, every time I start creating images, I don’t need to add the image size.
- Second, It helps me to find any older graphics (I have been using it for more than two years; so it’s difficult to find images from the previous time).
Ahrefs
My favourite SEO tool is Ahrefs.
Every time I perform keyword research or even a content gap analysis, I use Ahrefs.
The YouTube channel of Ahrefs also has a video series on how to do advanced research using this tool.
I prefer to start using it, even if you can’t afford this tool, go for the group buy.
Convertkit
I use convertkit to send emails and create opt-in email forms as well. Most of the email opt-in forms you see on my blog are created with convertkit.
If you’re a beginner and want to start with email marketing and generating a lead from your blog, convertkit will be helpful for you.
It offers some features like:
- Customizable email opt-in forms (templates)
- Free Landing page templates
- Email management up to 1000 subscribers.
- Easy to use interface
Yes, it doesn’t support email automation within the free version.
Buffer and socialit
Most of the time to schedule my social media posts, I use Buffer.
In the free version, you’ll get to add up to 3 social accounts. Even though I only schedule my posts to Facebook and LinkedIn, I shifted to socialit.io to see how it works
The best part about socialit.io is it offers all of their features for free free.
So if you’re looking for any social media scheduler without investing bucks on this, then socialit.io might be a good choice for you.
Final words

Have a look at the above image.
Let’s say you’re putting ‘X’ hours of effort to create content.
Assume that the amount of effort is the same for both cases.
Now, in case of content creation without repurposing strategy, you may create ‘Y’ amount of content.
But in other cases, you’ll have ‘Y+’ amount of content more than the previous one.
That means you can easily increase the content quantity without even losing quality.
If you’re just a one-man team or have a content team in your office, you must leverage the content repurposing.
But, It’s not just about repurposing but also to connect with people in different mediums.
If you divide your entire target audience based on content consumption, you might see a chart like the below one.
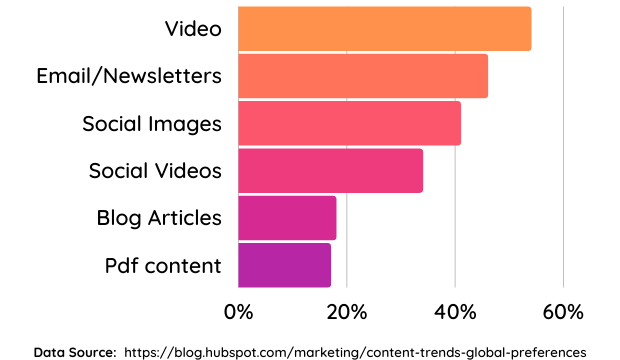
Data shows what kind of content people want to consume from a brand or business.
Obviously, if you’re just focusing on only one content format, you’re going to restrict your chance to get connected with more people.
There’s nothing wrong in that.
But why not to repurpose and plan your content in such a way that you can produce more quality content with less effort.
And, this is what I have shared in this blog post.
One last word: From planning my content to publishing, there is a lot of work to be done.
But when you’re passionate to achieve something hard, you have to work hard.
I wish you luck on your journey.
And, don’t hesitate to reach out to me if you have any query and doubts about this.

Sk Rafiqul Islam is a content marketing practitioner with 3+ years of practical experience. He spends most of his time helping businesses to build a loyal audience with content marketing. He is also running a tech career blog called 10Pie and content marketing VIP, a bi-weekly marketing newsletter. In his free time, he loves reading books and playing football.